
Everything between a bank statement and an overview.
Parendi grew out of a spreadsheet that had got too big. What's here earned its place in that spreadsheet. Everything else was allowed to stay out.
The file from your online banking is enough
camt.053 is the ISO 20022 account statement banks in many countries offer as XML. Parendi reads it with no preparation: you never hunt for a header row or map a column, because the account sits in the file as an IBAN. In the US, Canada, Australia and Brazil the statement is called OFX or QFX; it goes in the same way, and there the account type comes with it.
CSV and Excel work just as well but need your help once. The app proposes the columns, you confirm, and from then on it knows that format. Credit card statements are recognised by their card number and type columns, even when the export starts with four lines of preamble.
- Drag and drop into the window, or File › Import
- You pick the target account in the preview, pre-filled with what the file suggests
- Before saving you see every row with its category and can correct it
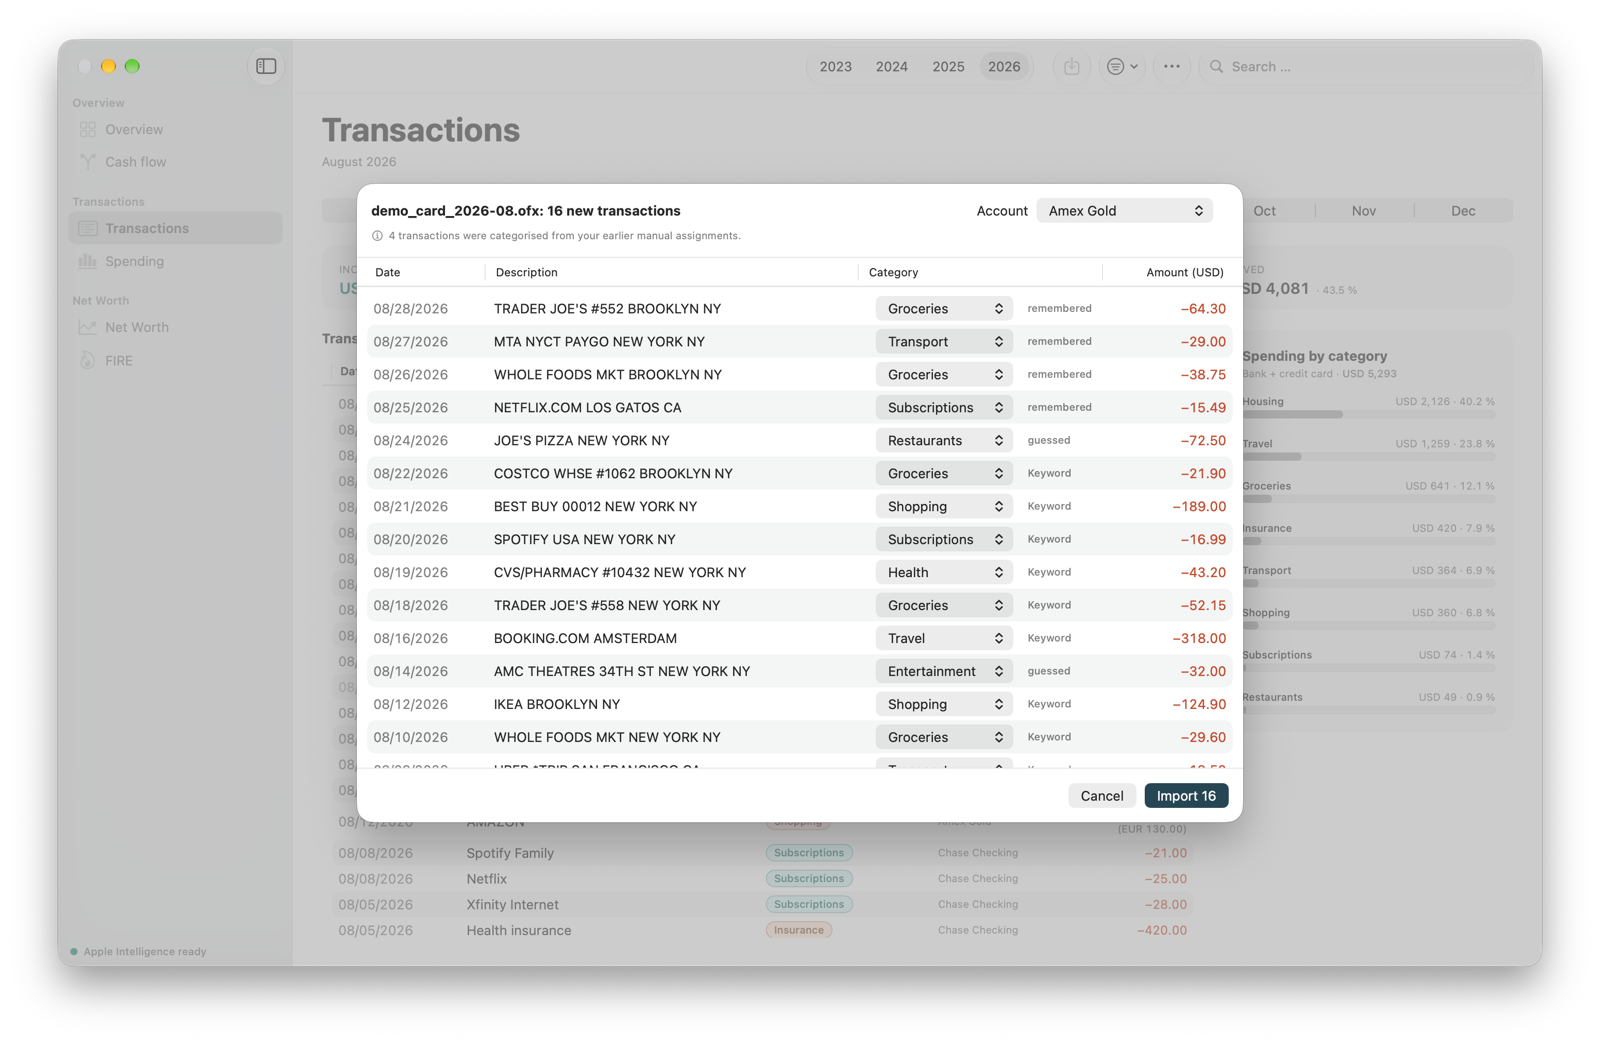
Importing twice is fine
Anything already in the database is skipped and reported. You can re-import the whole month when a transaction was posted late.
Credit cards count once
The card payment on your bank account and the line items on the statement are the same spending. The app treats the lump-sum charge as a transfer.
Several accounts
Each account is kept separately. Transfers between your own accounts are recognised by the IBAN in the text and don't count as spending.
When a file doesn't fit
The import halts and says what went wrong. From that same message you can send the file to me, as a masked copy or as the original.
Four routes to a category, in a fixed order
Memory first: if you have sorted this transaction by hand before, your decision stands. Then your keywords, then a category name found in the transaction text, and only then Apple Intelligence on your Mac.
Your manual correction therefore beats every rule and every guess. It holds until you change it yourself.
- Every row says which route decided it
- Keywords can be applied retroactively to older transactions
- A minus sign in front of a keyword excludes instead of includes
- A correction never turns into a rule on its own: what gets remembered is that exact transaction text, not a pattern
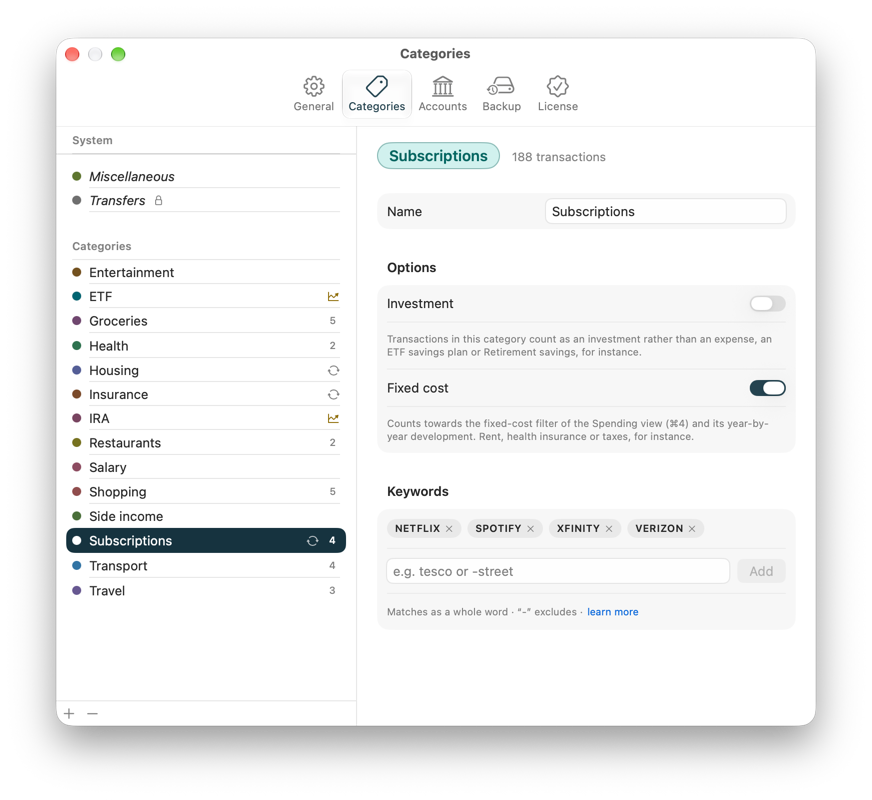
Starter categories per country
On first launch you get categories, keywords and pension positions. In eleven countries they fit the country: Switzerland, Liechtenstein, Germany, Austria, France, Italy, Spain, the UK, the US, Brazil and Japan. Everywhere else you start from a neutral set. Your Mac already knows which country applies. All of it is editable.
Without Apple Intelligence
Importing works exactly the same. Whatever memory and keywords don't catch lands in the catch-all category and waits for you.
Investing isn't spending
Categories like brokerage or pension count as investments. They don't lower your savings rate, because money invested is money saved.
One month, row by row
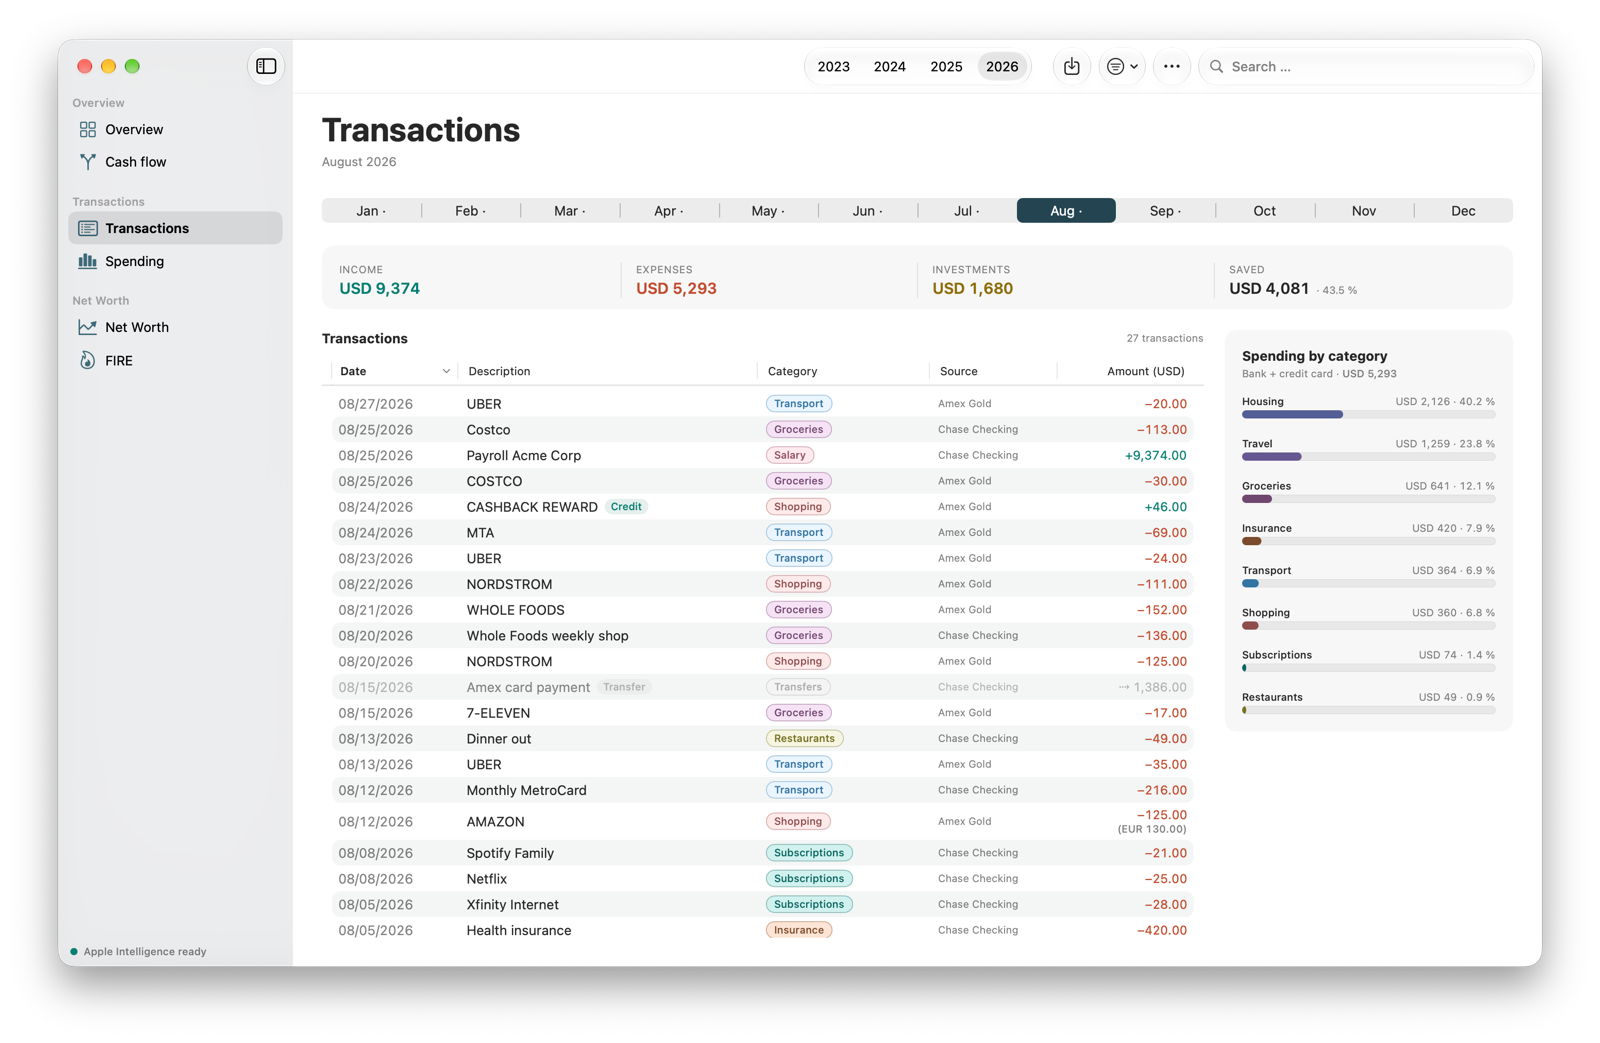
The twelve months sit along the top, with a dot under each one that has entries. Below them stand the numbers for the month you picked: income, spending, investments and what was left of it. To the right sits that month's spending by category, with each share of the total.
The table is the macOS one, and it behaves like it. You drag columns wider, sort with a click on the header and hide what you don't need from its context menu. Next month everything still stands the way you set it up.
- Search with ⌘F covers description, category and amount, either within the year or across all of them
- Transfers sit dimmed and labelled in the list, card refunds in green
- From the second account onwards the toolbar filters the list down to one of them
- A double click opens a row, and ⌥⌘← and ⌥⌘→ move you through the months
The statement stays the statement
On imported transactions the date, amount and description are fixed: they are what the app recognises on the next import. Type and category are yours to change, and bank transactions take a comment as well. Anything you entered by hand is fully editable.
One correction, every matching row
Change a category and the transactions with the same text in that period follow along. How many that is stands above the category list, and anyone who means only this one row finds the way to it at the very top of the menu.
What a merchant cost you
Search for a name and the balance of all hits appears on the right: income, spending, the difference. If the card refunded something, you see the net spend with the amount that came back below it.
A year on one screen
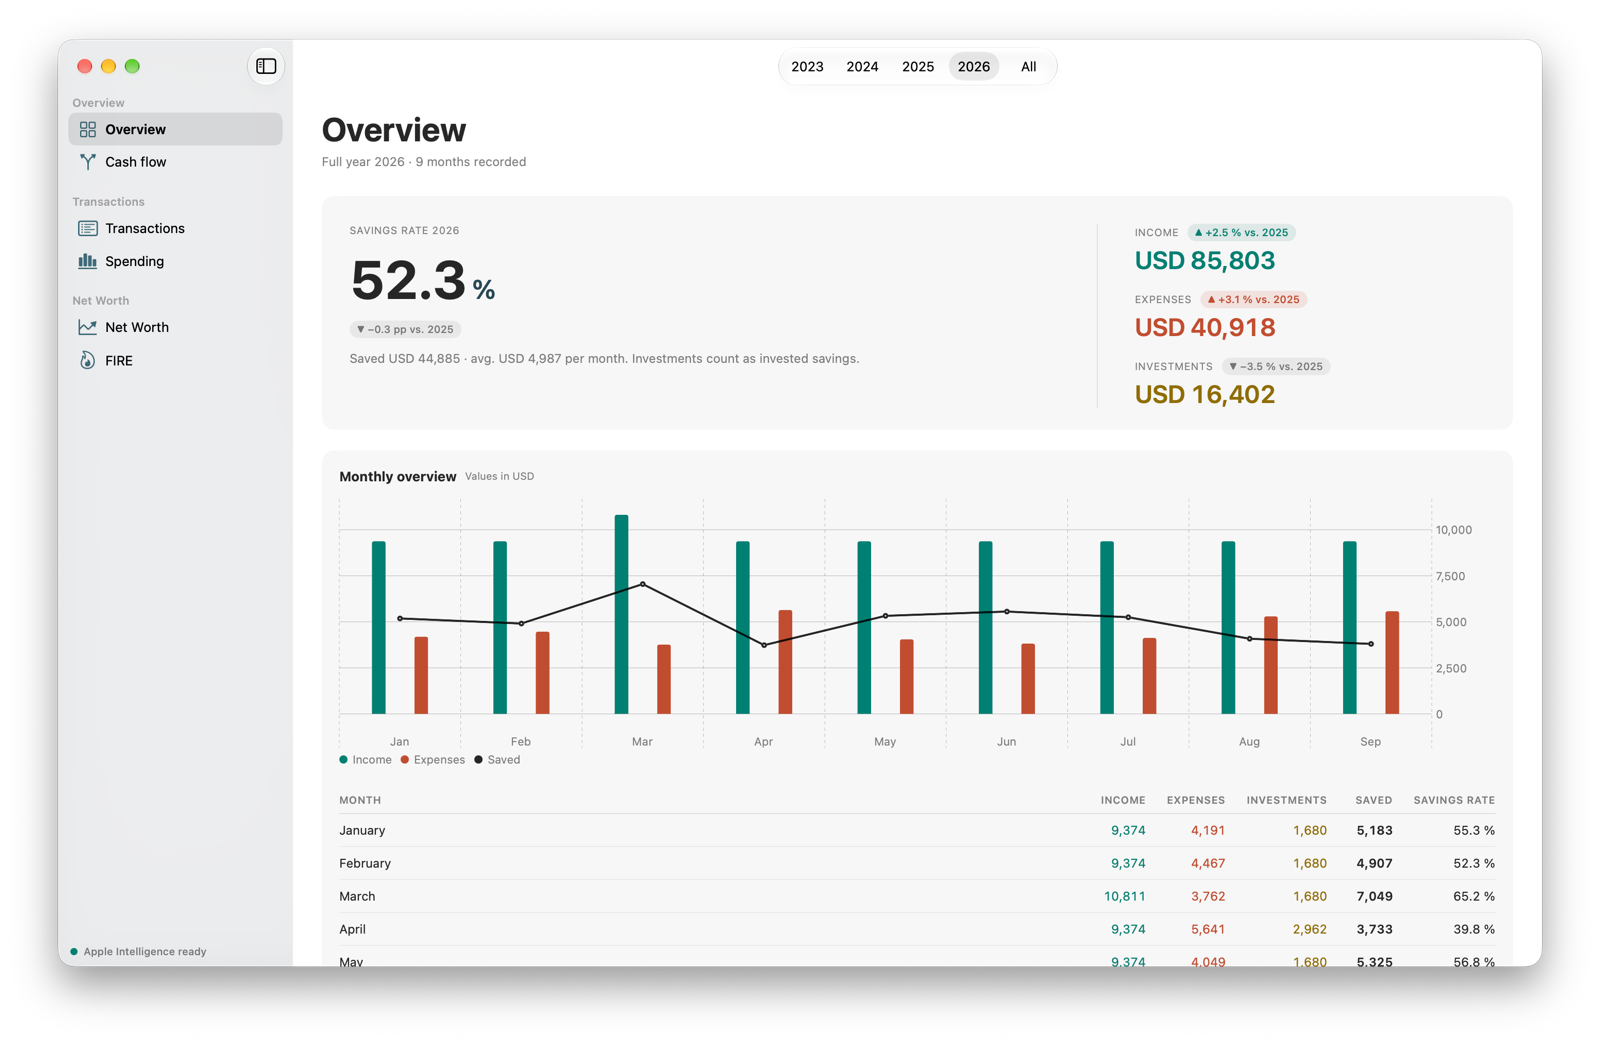
Savings rate, income, spending and investments, each against last year. Below that the monthly trend as a chart and as a table, because the table gives you the numbers the chart only hints at.
Saved means income minus spending here. Investments are not subtracted. Transfers between your own accounts drop out in both directions, or every payment into your savings account would look like an expense.
- One year or all years, switchable in the title bar
- Every table copies to the clipboard with ⌘C
- Colours never change meaning: income green, spending red, investments orange
From paycheck to category
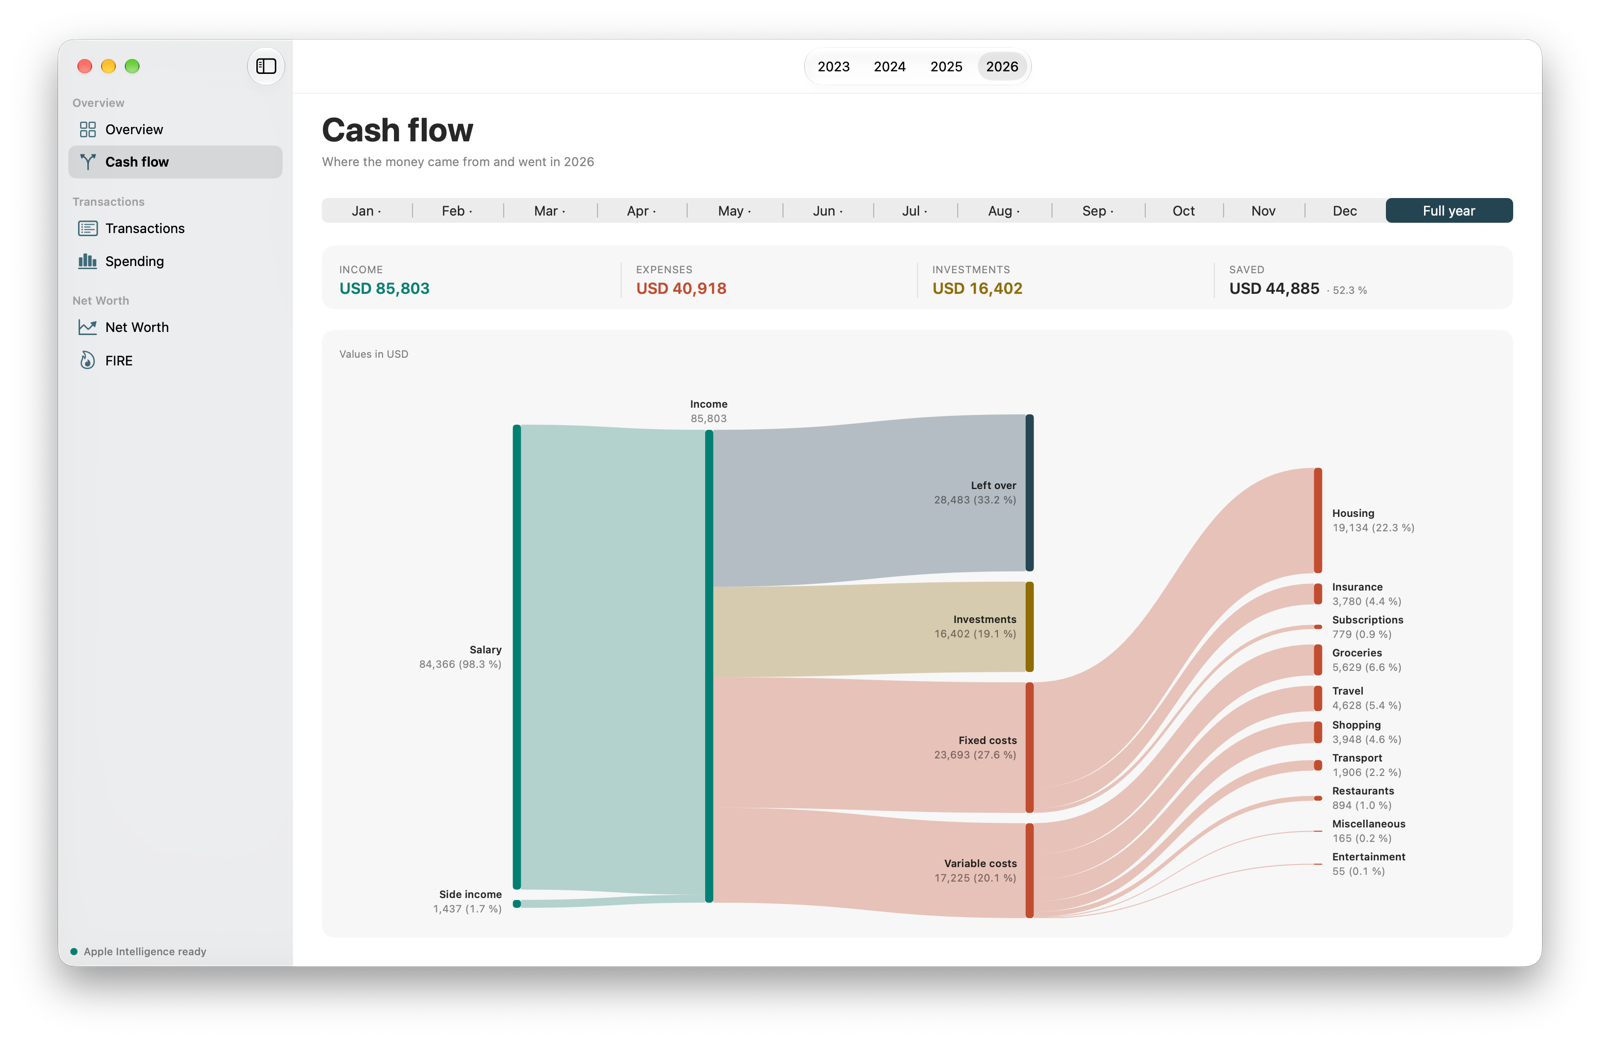
Cash flow draws a year or a single month as a diagram. Income comes in on the left and moves on to the right: what was left over, what you invested and what you spent, down to the single category. The width of each band is the amount.
If you have marked categories as fixed costs, spending runs through fixed and variable costs first. Then you can see how much of your income was already committed before you decided anything.
- Double-click a category to open its transactions for the same period
- Small categories are grouped and can be expanded
- Above it sit the same totals as in Transactions
What comes back every month
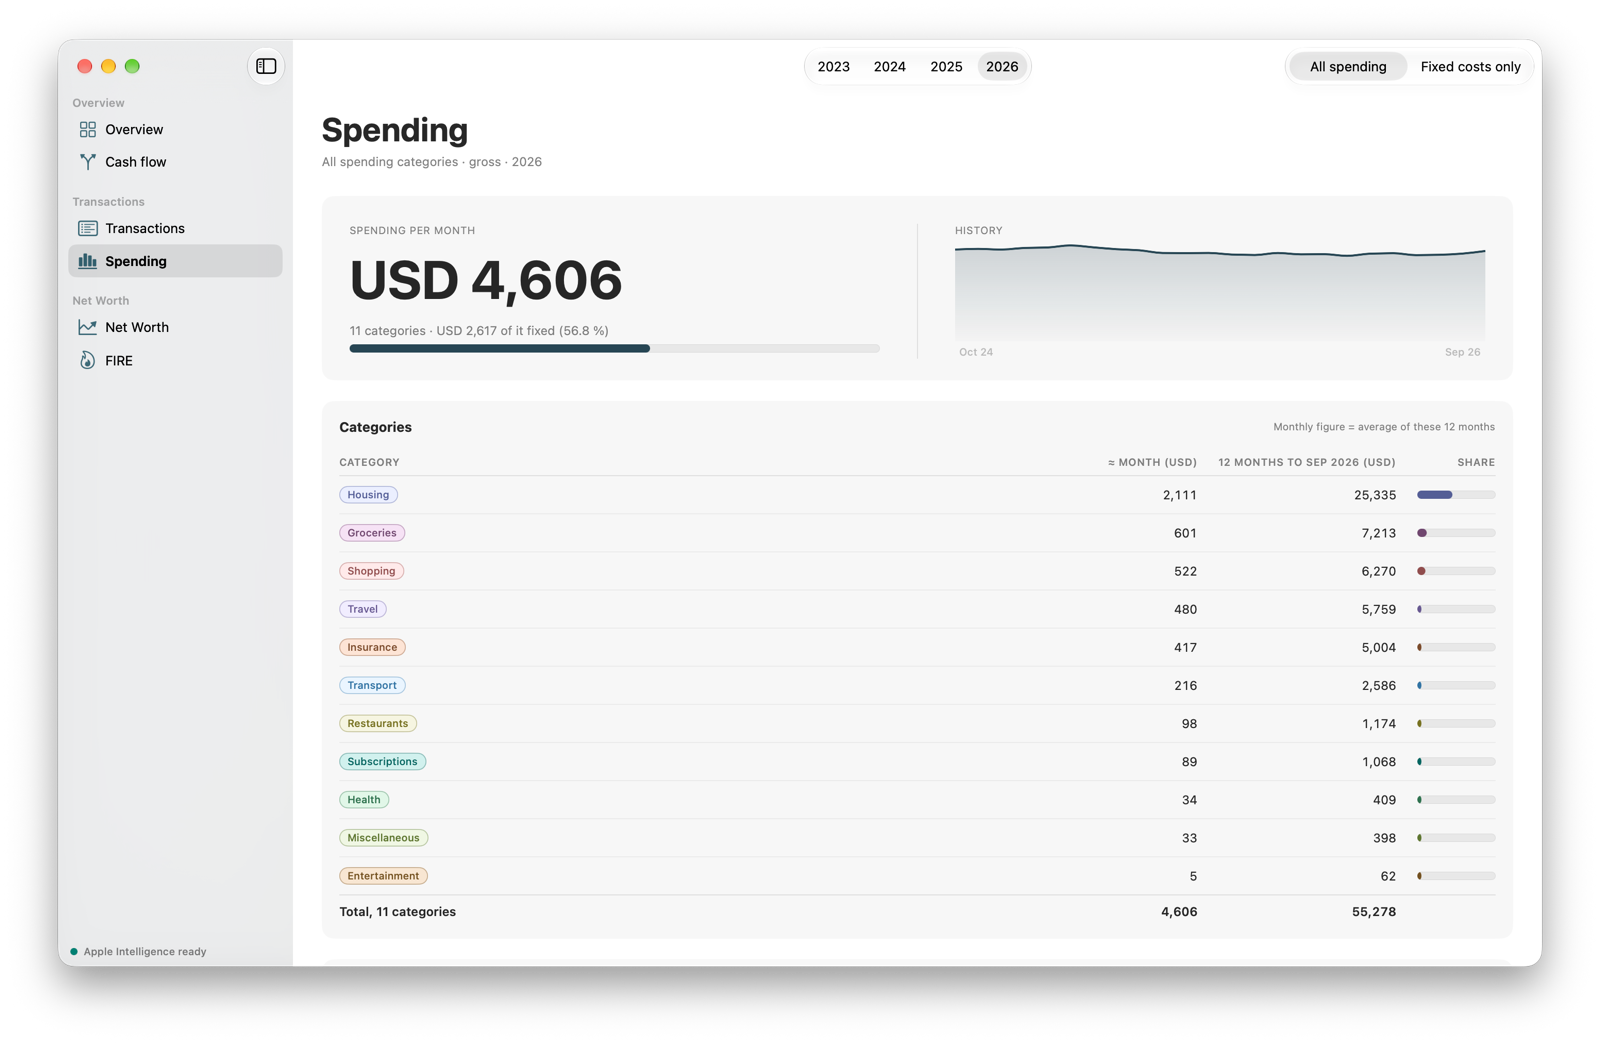
The spending view works out a monthly figure per category from the last twelve months. Two views, the same calculation: all categories, or only the ones you marked as fixed costs.
What counts as a fixed cost is your call. The app doesn't guess at it: whether your gym membership is fixed is something only you know.
- The trend shows whether a fixed cost has crept up over the months
- Jump from a category straight to the transactions behind it
- A gauge shows how much of your spending goes on fixed costs
What you own, and what you owe
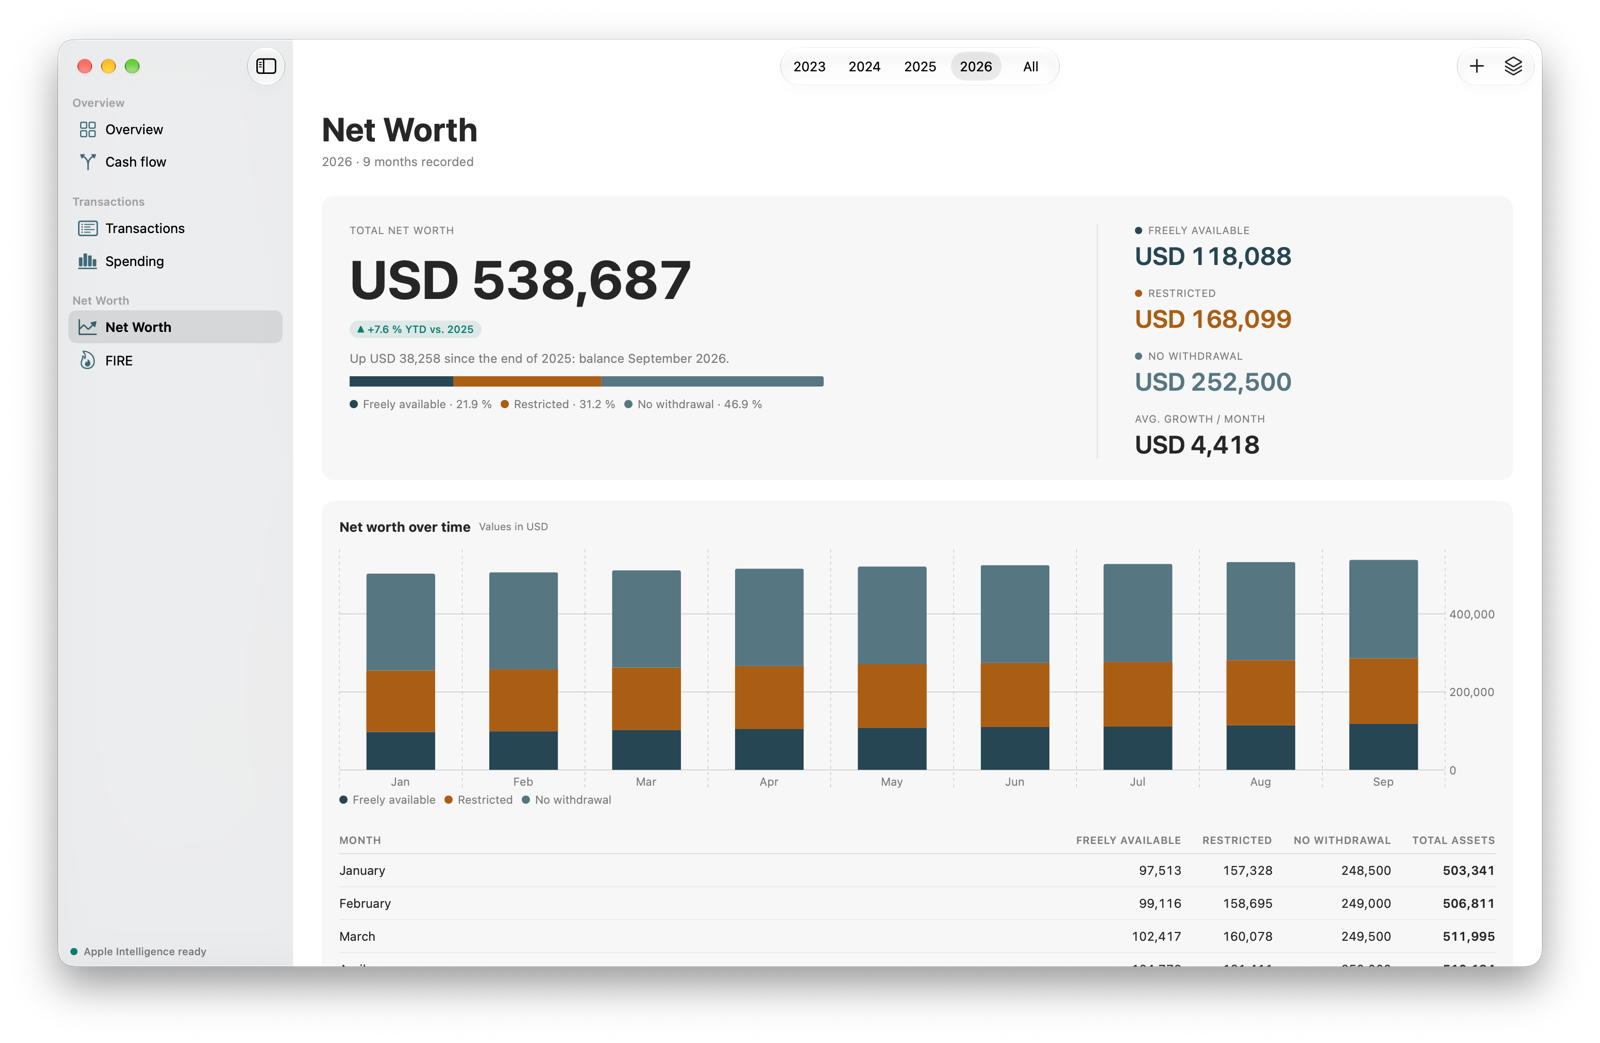
You create what you own: current account, brokerage account, pension, the house, the mortgage. Each position gets a monthly value, and the mortgage is allowed to be negative.
Every position has a kind, and the kind decides how it is counted: freely available, locked until retirement, or never withdrawable at all.
- History per month, stacked per year
- Positions can be archived without dropping their values out of history
- The house you live in counts towards net worth, never towards the FIRE number
The calculator that already knows
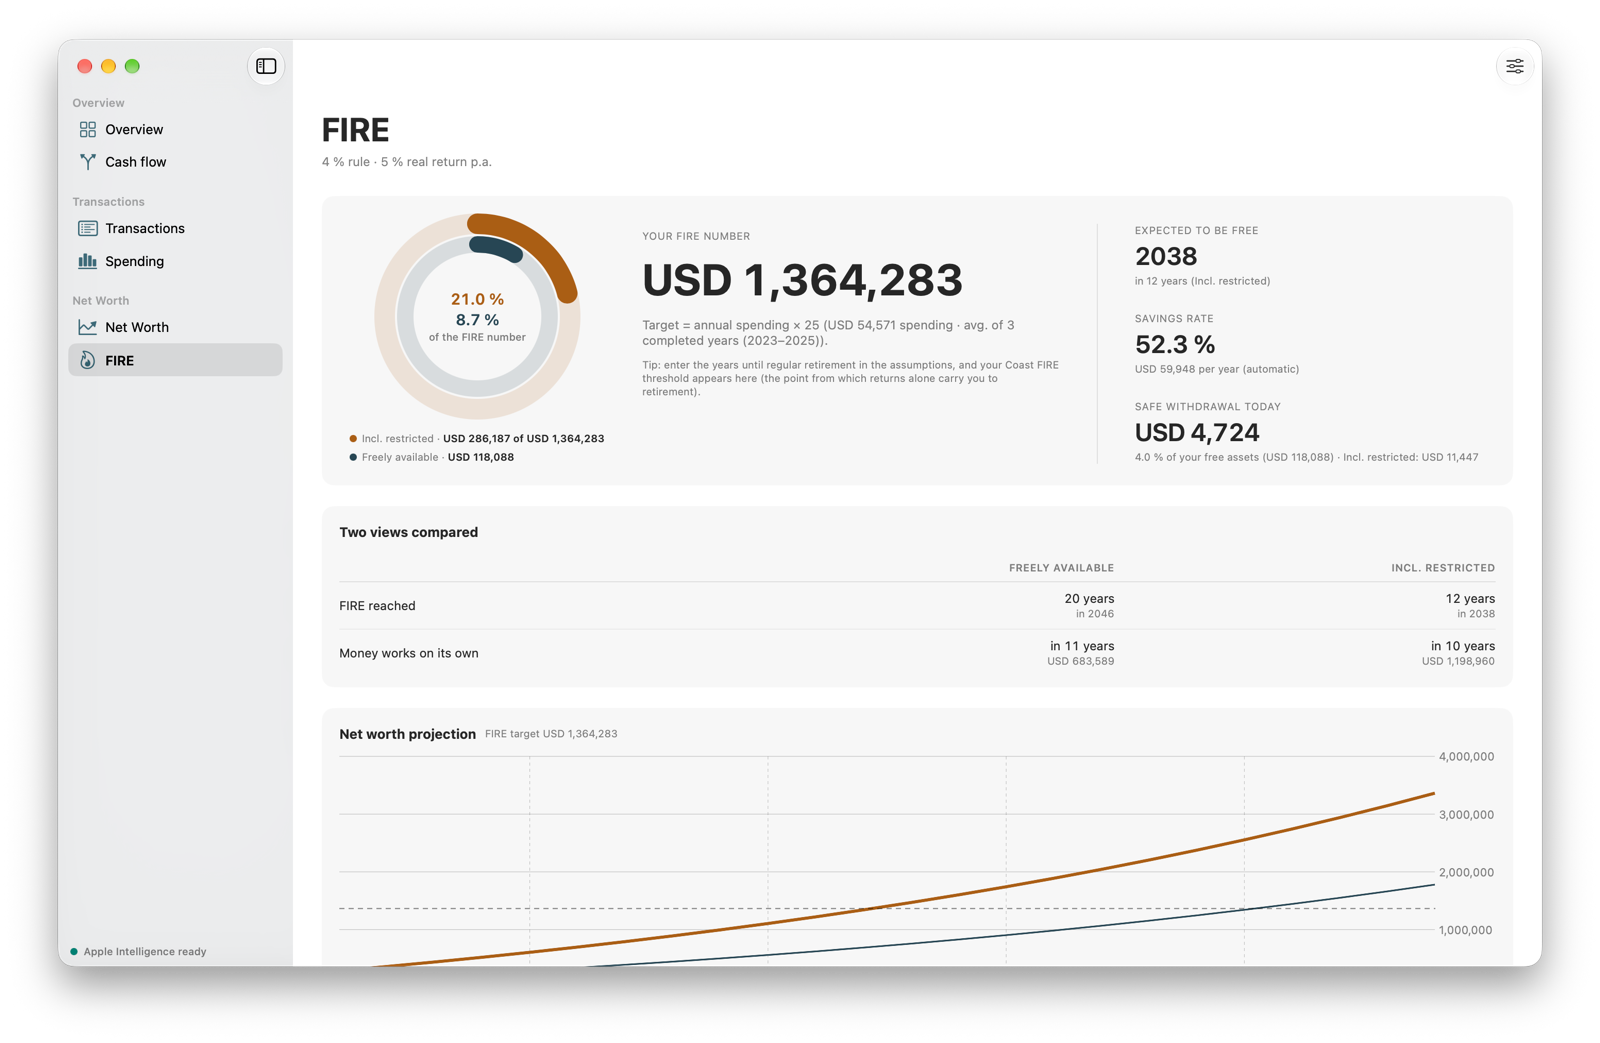
FIRE calculators on the web start by asking for your annual spending, your savings rate and your net worth. Parendi has all three already, from your transactions instead of your estimate.
What comes out is the point where your assets carry your spending. Everything in today's purchasing power, so the number means what it appears to mean. It stays a projection from assumptions you set yourself, and it is not financial advice.
- Two views: freely available assets only, or everything including pensions
- Why it takes two is on pillar 3a and FIRE
- Return, inflation and withdrawal rate are yours to set
- Progress arrives as a year, not as a bar
One file, and it's yours
Everything lives in a SQLite database on your Mac. There is no account for it, nothing syncs and nothing is transmitted anywhere.
| Backups where you want them | Once a day the app writes a backup to the folder you choose. iCloud Drive, an external disk, whatever you prefer. ⌘B any time you want one now. |
|---|---|
| Sensible retention | The last 30 days are kept in full, then one per month. Restoring happens from inside the app. |
| Moving to a new Mac | Restore a backup and you're done. No account holding your data, no activation that can go missing. |
| Undo, as everywhere else | ⌘Z reverses changes, and the Edit menu names what is about to be undone. |
The small things you notice every day
- Light and dark
- The app follows your system, with no setting of its own for it.
- Seven languages
- German, English, French, Italian, Spanish, Portuguese (Brazil) and Japanese, switchable in settings, effective at the next launch.
- Francs, euros, your currency
- Parendi takes the currency and number format from your Mac on first launch. If your money is in a different currency, change it in Settings.
- Copying, as you'd expect
- ⌘C puts any table on the clipboard as tab-separated text, ready to paste into a spreadsheet.
- Display names
- A cryptic transaction line can be renamed. The original text stays visible and still counts for matching on the next import.
- Manual entries
- Cash and anything that appears on no statement goes in by hand.
- Renaming accounts
- A name is only a name. History follows, because transactions hang on the account and not on its label.
- Keyboard
- The app works through menu commands rather than hidden gestures. Anything with a shortcut shows it in the menu.
Try it for 30 days
The trial starts at your first import, not at installation. If you only get to it two weeks later, you lose nothing.
